Thursday, January 26, 2017

Valentine's Day ideas


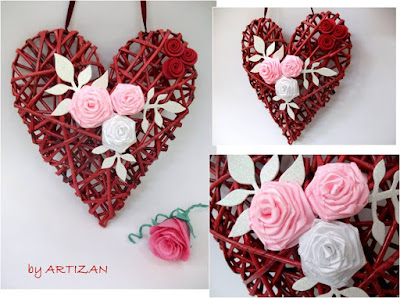
Are you searching for the perfect gift for your loved one for Valentine's Day? If the answer is "Yes", I have gathered here for you a few wonderful ideas of  "another kind of gifts": special, personalized, unique, eco friendly gifts, entirely handmade of old recycled newspapers that for sure She or He has never seen elsewhere. 
Our theme is of course the red heart and from here we will have small variations, maybe red with white, beige or pink, a woven heart decorated with satin roses or standing hearts for her/ his desk, heart-shaped baskets and even frames with hearts made of paper roses. 


Another cute gift would be a small wooden frame decorated with newspaper roses having the word "LOVE" written in the middle with letters cut out of magazines or newspapers. 


One of these days I'll prepare for you a photo tutorial on how to make a heart-shaped decoration from newspaper tubes like the ones in the photos, which you can make any color you want and decorate as you like, using satin ribbons, fabric or foam flowers, beads, pearls, lace and any other materials you can think of. So, until our next encounter, I wish to you all to be loved and happy and of course...to find or make yourself the perfect gift for the people you love!
If you haven't already, subscribe to my blog, share it with your friends and also follow us on Facebook, Instagram and Pinterest.

Thursday, January 19, 2017

How to make a beautiful pen holder out of recycled materials

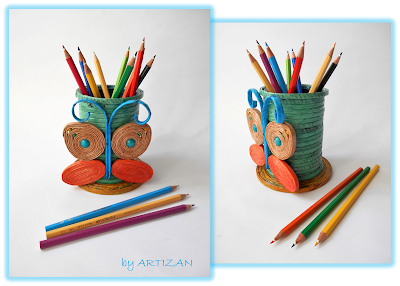
I have prepared this tutorial to give you an idea about how you can recycle aluminium cans and newspapers in an original and colorful pen holder, using materials and tools that more or less we all have at home, like: scissors, brush, white glue, a barbecue wooden stick, newspapers (newspaper tubes) and the aluminium can, of course. For those who don't have painting as a hobby, they just need to purchase a few tubes of acrylic or gouache paint of their favorite colors and a spray with varnish (transparent). This is the pen holder we'll  make together and keep in mind you can always change the colors according to you preferences and add a personal touch to it :


First you have to cut some strips or rectangles from a newspaper as you see in photo no. 1 and glue them on the aluminium can inside and out, including the bottom and allow to dry (photo 1, 2). When dried, you paint it entirely with any color you want and allow to dry (photo 3).


The next step is to cover it all around with newspaper tubes, in the natural color and you paint it after or, if you have already painted tubes like in my case, you can use them (photo 4). In the photo no. 5, you can notice how we connect the tubes placing the narrow extremity of the first tube in the large extremity of the tube you need to add. Like that your work will look neat and pretty.


When you reach the top of the can, you should make two more rounds over each other in order to make a nice border at the top, as you can see in photo no. 7 and then give it a good layer of white glue diluted with a bit of water and allow to dry. Next we make the base coiling some paper tubes as you see in photo no. 8.  You measure if the base is big enough like in photo no. 9, what we want is to have a bigger diameter then the can's. When it's ready you give it a layer of white glue on one side, allow to dry and then do the same with the other side. When dried completely you paint it in any color you want (photo 10).


The next thing we have to do is to make the butterfly and here are the steps: the lower part of the wings is easier to make, so you can start with it by coiling newspaper tubes in an oval shape. You have to make two of them, using two tubes for each one, then give both a layer of white glue on both sides and after paint with the color you want, also on both sides. The upper part of the wing has a wooden bead in the center, so you should begin rolling the tubes as you see in photo no.11, inserting the narrow extremity of the tube in the whole of the bead and than rolling around it. After a few rounds you will add a smaller bead as you see in the photo no. 12 and after another two - three rounds you add another small bead in the same way and finally close. You repeat the action for the second wing paying attention to keep the same colors in the same order and the same number of rounds so that the wings will be identical (photo 13).


When wings elements are ready, you take another newspaper tube and double it in half and roll it a bit at the ends. If you don't have painted tubes you can just make the butterfly from blanks and then paint it as you wish. For the body of the butterfly you have to measure and adjust the middle tube as in photo no. 15. to have the perfect size. Next you arrange all elements as in photo no. 16 and glue them together well and give it all around a layer of white glue to keep its shape and harden. When dried you just place it on the pen holder, adjust and glue it preferable with hot silicon. When everything is ready, dry and in place you can just give a layer of varnish for wood or the one in spay, to make the product shinier and more resistant.


And that was it! Wasn't so hard, wasn't it? :) It just needs a bit of time and patience and a lot of ...love for handmade :).  If you can't finish the product in the same day it's perfectly O.K. You can just finish some steps and take a break when you allow the elements to dry and continue later or the next day.
If you liked my project of recycling and decorating, subscribe to my blog and share it on your Facebook page or Pinterest.
You can also leave a comment if you have any questions or send me the photo of your own pen holder with butterfly :).
Recycle! Be creative! Be original!

Tuesday, January 17, 2017

Baskets and boxes for storing cosmetics and accessories

Hi everybody! In this post I want to suggest to the ones that know a thing or two about newspaper waving some new models of baskets and boxes that would be great for storing your cosmetics or accessories. We all have a lot of stuff laying around on our bathroom shelf or beside our make up table and here you have some ideas of lovely, beautiful baskets and boxes with cover or not, as you prefer, in which you can just collect everything, letting your shelves and tables look clean and nifty.
For the beginners, just let me know which shape you liked more and found suitable for your needs and I will make a tutorial to show you how to make it yourself. If you ever started a similar project that has not succeeded, just let me know in a comment what was the problem and I will try to guide you to solve it.


Don't forget to leave a comment and ask for your favorite model's tutorial. Also, if you want to receive all my new post, just leave your email address and and press the Subscribe button from the top right side of the page.

Wednesday, January 11, 2017

Kids Room Decorations


Today I thought it would be a nice idea to show you some of my decorations created specially for kids rooms. As you see, I have done some baskets for toys or other type of storage, some pen holders, desk organizers, frames, bunnies, fish, a hanging decoration with half moon and stars and boxes shaped and decorated especially for kids . I hope you'll enjoy my ideas and I promise to update this category as often as possible... All these items are entirely handmade using recycled materials, mostly old newspapers, but I have used aluminium cans, jars and cardboard as well. 
I hope you like them and let me a comment about your favorite ones!