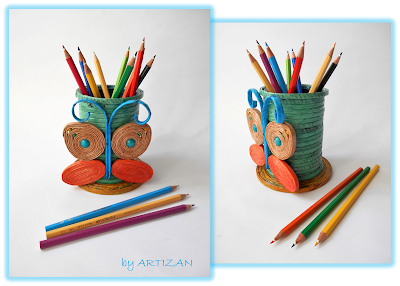
First you have to cut some strips or rectangles from a newspaper as you see in photo no. 1 and glue them on the aluminium can inside and out, including the bottom and allow to dry (photo 1, 2). When dried, you paint it entirely with any color you want and allow to dry (photo 3).
When you reach the top of the can, you should make two more rounds over each other in order to make a nice border at the top, as you can see in photo no. 7 and then give it a good layer of white glue diluted with a bit of water and allow to dry. Next we make the base coiling some paper tubes as you see in photo no. 8. You measure if the base is big enough like in photo no. 9, what we want is to have a bigger diameter then the can's. When it's ready you give it a layer of white glue on one side, allow to dry and then do the same with the other side. When dried completely you paint it in any color you want (photo 10).
The next thing we have to do is to make the butterfly and here are the steps: the lower part of the wings is easier to make, so you can start with it by coiling newspaper tubes in an oval shape. You have to make two of them, using two tubes for each one, then give both a layer of white glue on both sides and after paint with the color you want, also on both sides. The upper part of the wing has a wooden bead in the center, so you should begin rolling the tubes as you see in photo no.11, inserting the narrow extremity of the tube in the whole of the bead and than rolling around it. After a few rounds you will add a smaller bead as you see in the photo no. 12 and after another two - three rounds you add another small bead in the same way and finally close. You repeat the action for the second wing paying attention to keep the same colors in the same order and the same number of rounds so that the wings will be identical (photo 13).
When wings elements are ready, you take another newspaper tube and double it in half and roll it a bit at the ends. If you don't have painted tubes you can just make the butterfly from blanks and then paint it as you wish. For the body of the butterfly you have to measure and adjust the middle tube as in photo no. 15. to have the perfect size. Next you arrange all elements as in photo no. 16 and glue them together well and give it all around a layer of white glue to keep its shape and harden. When dried you just place it on the pen holder, adjust and glue it preferable with hot silicon. When everything is ready, dry and in place you can just give a layer of varnish for wood or the one in spay, to make the product shinier and more resistant.
And that was it! Wasn't so hard, wasn't it? :) It just needs a bit of time and patience and a lot of ...love for handmade :). If you can't finish the product in the same day it's perfectly O.K. You can just finish some steps and take a break when you allow the elements to dry and continue later or the next day.
If you liked my project of recycling and decorating, subscribe to my blog and share it on your Facebook page or Pinterest.
You can also leave a comment if you have any questions or send me the photo of your own pen holder with butterfly :).
Recycle! Be creative! Be original!


No comments:
Post a Comment